October 7th, 2024 at 12:00 am
This is a sample post created to test the basic formatting features of the WordPress CMS.
Subheading Level 2
You can use bold text, italic text, and combine both styles.
- Step one
- Step two
- Step three
This content is only for demonstration purposes. Feel free to edit or delete it.
 Comments Off on Test Post for WordPress
 -
September 11th, 2024 at 12:00 am
This is a sample post created to test the basic formatting features of the WordPress CMS.
Subheading Level 2
You can use bold text, italic text, and combine both styles.
- Step one
- Step two
- Step three
This content is only for demonstration purposes. Feel free to edit or delete it.
Comments Off on Test Post for WordPress -
April 19th, 2017 at 8:24 am
Penetrations are often made in metal roof decks in order to install sump pans, or drains. According to the Steel Deck Institute when a 14 gauge sump pan is properly installed it will carry the load of the deck that it replaced and act as a small header to transfer loads into the adjacent sheets.
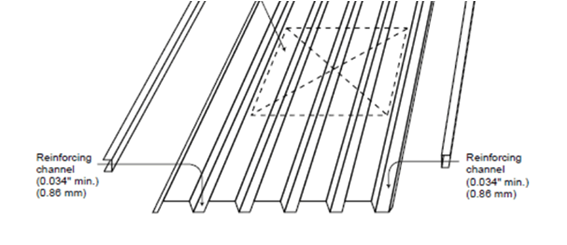
Place 1 1/2″ deep reinforcing channels in each rib at each side of opening. Attach flanges of sump pan to channels or Z reinforcing.
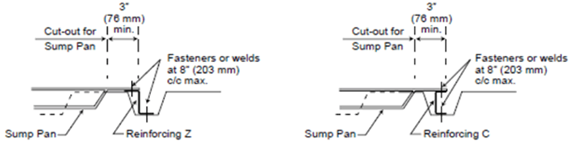
Sump pan attachment to channel or Z reinforcing
Channels may be used to reinforce the deck on both sides of the opening. Each end of the channels must rest on a primary support and fastened securely to the deck and sump pan.
Tags:
installation,
metal roof deck,
sump pan
Comments Off on Installation Guide – Sump Pans -
April 14th, 2015 at 9:26 am
Solar Roofs initial cost is about twice as much as many standard roofing systems. However many of us know little about them in general.
Like how does a solar roof system function? This can be complicated to explain to someone that is not familiar with solar systems. Basically when sunlight hits the PV panel, it’s cells absorb that energy and generate electricity in the process. The electrical properties of the PV cell provide all the voltage needed to drive that current though an external load. The system generates DC electricity, which is converted to usable AC power. The power will be stored and distributed through the existing electrical outlets throughout the building. Of course that is just the short version, but hopefully you get the point.
Is a solar roof system worth the investment? Well that depends. If you are in Florida and get plenty of sunshine year around you will get more out of a system than somewhere like Alaska. It’s not uncommon for companies to save 40% or more on their electricity bills a year, and most save a minimum of 15%. Many state and federal incentives are offered as well, that can save a company even more money. As you can see these systems can eventually pay for themselves, and a good system should last 20 years or more if properly designed and installed.
Tags:
energy saving,
solar
Comments Off on Solar Energy – The Basics Part 1 -